其他
收录 vue 中的小知识点
动态数组 class
txt
:class="[
      currentTab == i - 1 && ['bg-red-200 text-blue-800']
  ]"
setup 指令
vue
import vWatermask from "./plugins/watermask";
<div v-watermask="a"></div>
🔥 自定义 ref
创建一个自定义的 ref,显式声明对其依赖追踪和更新触发的控制方式。 :::tip ref 机制 在原生的
ref中,当你使用ref值的时候,会触发响应式的get方法,进行依赖收集
当你修改ref值的时候,会触发响应式的set方法,进行依赖更新。 :::
所以自定义 customRef 也要 触发 收集/更新 的功能
类型
ts
function customRef<T>(factory: CustomRefFactory<T>): Ref<T>
 type CustomRefFactory<T> = (
   track: () => void,
   trigger: () => void
 ) => {
   get: () => T
   set: (value: T) => void
 }
示例
ts
import { customRef } from 'vue'

 export function useDebouncedRef(value, delay = 200) {
   let timeout
   return customRef((track, trigger) => {
     return {
       get() {
        // <!-- 依赖收集 -->
         track()
         return value
       },
       set(newValue) {
         clearTimeout(timeout)
         timeout = setTimeout(() => {
           value = newValue
          // <!-- 触发依赖更新 -->
           trigger()
         }, delay)
       }
     }
   })
 }
定义组件
- 使用对象字面量
ts
const Host = {
      setup() {
        return () =>
          h(component, {
            ...props,
            ...eventListener,
          })
      },
};- 使用 render
ts
const Host = {
        render() {
         return h(component, {
          ...props,
          ...eventListener,
         })
      },
}- 使用 defineComponent 函数包裹 setup
ts
const Host = defineComponent({
   setup() {
     return () =>
        h(component, {
         ...props,
         ...eventListener,
       })
   },
});- 使用 defineComponent 函数包裹 render
ts
const Host = defineComponent({
      render() {
        return h(component, {
          ...props,
          ...eventListener,
        })
      },
  })
都可以使用下面的方法创建组件
ts
function mountInstance(
  component: any,
  props: Record<string, any> = {},
  eventListener: Record<string, any> = {}
): {
  unmountInstance: () => void
} {
  const Host = defineComponent({
    setup() {
      return () =>
        h(component, {
          ...props,
          ...eventListener,
        })
    },
  });
  const { unmount } = mount(Host)
  return { unmountInstance: unmount }
}

import {type ComponentPublicInstance,type Component} from "vue"

interface MountInstance {
  instance: ComponentPublicInstance
  unmount: () => void
}

function mount(component: Component): MountInstance {
  const app = createApp(component)
  const host = document.createElement('div')
  document.body.appendChild(host)

  return {
    instance: app.mount(host),
    unmount() {
      app.unmount()
      document.body.removeChild(host)
    },
  }
}
命令式组件
弹窗组件
使用
tsshowMsg('要显示的消息',(close)=>{ console.log("确定") close() // 关闭弹窗 })定义
showMsg.js
在 messageBox 需要 msg props,同时 emit("click")事件
jsimport messageBox from '../component/messageBox.vue' function showMsg(msg,callback){ const div = document.createElement('div'); const app = createApp(messageBox,{ msg, onClick:()=>{ callback(()=>{ app.unmount(div) // 卸载组件,防止内存泄漏 div.remove() // 删除dom }) // 关闭弹窗 } }) document.body.appendChild(div) app.mount(div) }定义函数组件
为了高内聚/低耦合, 可以进一步改写
messageBox.vue为 js 文件,使用
render方法渲染组件,使用 jsx 创建 vNode
在render方法的形参中解构出$props和$emit属性jsconst MessageBox = { props:{ msg:{ type:String, required:true }, }, render(ctx){ const {$props,$emit} = ctx return <div class="modal"> <div class="box"> <div class="text">{$props.msg}</div> <button onClick={$emit('onClick')}>确定</button> </div> </div> } }完整代码
tsximport { styled } from '@styils/vue'; const modalDiv = styled("div", { color:'red', }, ) const MessageBox = { props: { msg: { type: String, required: true }, }, render(ctx: { $props: any; $emit: any; }) { const { $props, $emit } = ctx; return ( <modalDiv variants={{size:"small"}}> <div class="box"> <div class="text" > {$props.msg} </div> <button onClick={$emit('onClick')} > 确定 </button> </div> </modalDiv> ) } } function showMsg(msg: string, callback: (close:Function)=>void) { const div = document.createElement('div'); const app = createApp(MessageBox, { msg, onClick: () => { callback(() => { app.unmount() // 卸载组件,防止内存泄漏 div.remove() // 删除dom }) // 关闭弹窗 } }) document.body.appendChild(div) app.mount(div) } export default showMsg
静态文件的动态访问
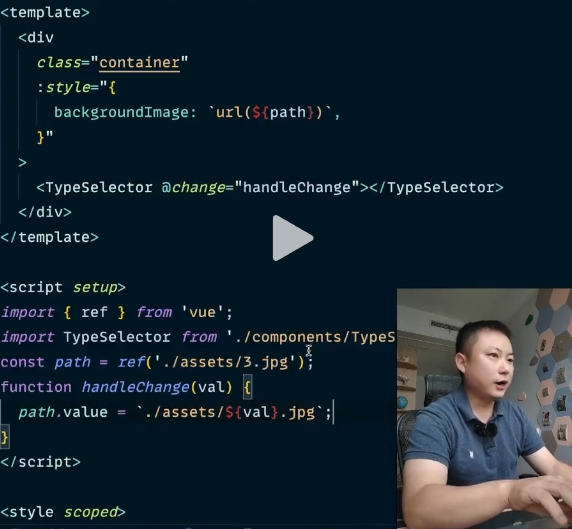
原因是打包之后路径发生变化
会发生 vite 自动转换路径的情况
- css 中的静态路径
- img 中的 src 静态路径 (非 v-bind)
- 使用
import()语句,打包之后会附带一个 js 文件
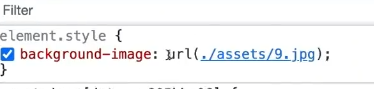
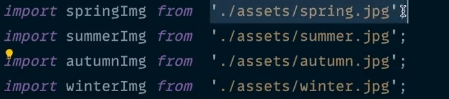
解决办法
- 直接当做一个模块引用 返回的是打包之后的路径
- 使用
import语句, 打包之后会附带一个js文件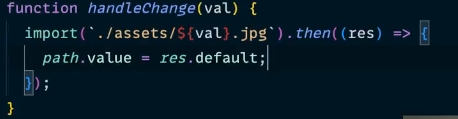
- 使用
URL
其中
i代表了当前模块mport.meta.url new URL('./xxx.jpg', i代表当前模块的相对路径mport.meta.url)

在 .vue文件中使用 tsx
lang 直接定义为 tsx
vue
<template>
   <div>
     <Fn :a="1" />
   </div>
 </template>
 <script lang="tsx" setup>
   const Fn = ({ a }) => {
     return <div>{a}afdfaf</div>;
   };
 </script>
css 文件
JS 中使用 SCSS 变量
必须定义为 `module` 格式index.module.scss
scss
$title:red;

:export {
  title:$title
}
使用
vue
<script setup>
export default {
  import config from "./index.module.scss"
  // {title: 'red'}
  console.log("🚀 ~ file: App.vue:10 ~ config:", config);
}
</script>
SCSS 使用 JS 变量
js
const currentBgColor = ref('#333333')
const currentTextColor = ref('#FFFFFF')
ts
const onBtnClick = (bgColor: string, textColor: string) => {
  currentBgColor.value = bgColor
  currentTextColor.value = textColor
}
scss
.example {
    --textColor: v-bind(currentTextColor);
    --bgColor: v-bind(currentBgColor);
    color: var(--textColor);
    background: var(--bgColor);
  }
注册
全局注册
x-ui.ts
ts
const components = [
  Button,
  Icon
]

const install = (app: App) =>{
  comonents.forEach(component=>{
    app.component(component.name,component)
  })
}

export default {
  install
}
main.ts
ts
import Xui from "./x-ui"
app.use(Xui)
局部注册
vue-shim.d.ts
ts
declare module '*.vue' {
  import { DefineComponent,App } from 'vue';
  const component: ReturnType<typeof DefineComponent> & {
    install(app: App): void;
  };

  export default component;
}
--host
js
"dev": "vite --host=0.0.0.0",你可以将 Vite 服务器设置为监听所有可用的网络接口,而不仅仅是默认的本地回环地址(127.0.0.1)